So do you think you know how to put lipsticks on? Of course you do, everyone does! But are you sure your lips always look the best, err ... not so sure, right? How about I share some tips to make your lips more attractive with lipsticks? I'm not saying I know everything about ways to make your lips look the best but at least I experienced myself that these tips actually helped my lips' condition better and ultimately look good despite the types of lipsticks I use.
Make sure lips are in the best condition!
 |
| Bare Lips |
Alright, you all should already know about this most important step: you must moisturize your lips anytime you feel they need to be moisturized. It's not just about having a nice look with lipsticks, it's about having healthy lips!
I've heard somewhere that using lip balms too much will make it worse:
lip balms do nothing except creating a layer to seal the moisture inside and make lips not recognize the dryness in time to reproduce new skin; when the lip balm on lips fades away, the skin on top is exposed to the air and drys out quickly but the new skin underneath isn't ready yet. However, when I tried not to apply lip balms so often, my lips were chapped like crazy so I had to keep peeling off the death skin and yes, the new skin was ready but ... that was not what I want ... I don't know about you but I rather put lip balms on often enough to keep my lips always moisturized.
How things work for me:
Putting lip balm on constantly helps my lips feel soft all the time. Moreover, I believe some lip balms DO moisturize lips and not just sit on. Now my lips don't feel too dry anymore even without lip balm on top. My life savior:
EOS Smooth Sphere Lip Balm!
When I have dry and lips:
There are days when I abuse my lips too much (putting lipsticks that dry out lips), the next morning I wake up with very dry lips but then after I brush my teeth and wash my face, the death skin is soft enough (since my lips are still wet) so I just use finger to scrub it off. It comes off completely revealing smooth new skin (which I guess is formed overnight) -
this is when my lips are in the best condition.
Immediately, I apply lip balm again to seal in the moisture before doing anything else in my morning routine. That is how I have nice smooth lips prepared for lipsticks! ;)
* Also drink a lot of water and don't lick your lips so often. Tongue carries a lot of germs and licking your lips means taking way the natural moisture your skin produces.
What type of lip balms should we use?
- Avoid lip balms that have: paraben, menthol, camphor, phenol, artificial fragrances, silicone oil and salicylic acid.
- Natural ingredients can still cause irritation and allergic reactions.
*** My recommendation:
#1 EOS Smooth Sphere Lip Balm
This is my most favorite lip balm - 95% organic, 100% natural, and paraben and petrolatum free. I love how it stays on for so long, reducing the times I have to reapply during the day. I also love how it isn't too waxy or glossy, which is perfect to be a base for lipsticks!
However, make sure you're not allergic to any natural ingredients. I also saw some complains about EOS causing infection but I think it is because the packaging makes it easy to get dirty. Sometimes, I use alcohol to wipe outside AND inside the sphere as well as on top of the balm to kill bacteria and germs, then use a clean paper towel to scrub off the top layer of the balm to make sure there's no alcohol left on it.
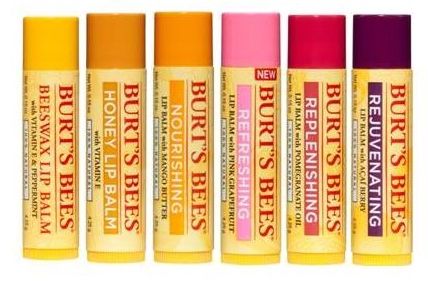
#2 Burt's Bees
Another brand that has natural lip balms. They're a little too waxy (some are glossy) for me but in general still a good brand. Guys love them ;)
*** Others under consideration:
Vaseline
It's too glossy for me and I know for sure it isn't absorbed into your skin; what I'm saying is it goes away too fast before I even realize I need to put some more in. Of course, there's NO WAY I can apply lipstick with Vaseline on; the color keeps moving around my lips, bleeds, and can never cover my lips' natural color well. I also don't recommend it because it's a petroleum-based product which I've seen some advising to avoid. Nevertheless, I believe it works very well for many people so maybe it's just me.
Rosebud
This company has been around for a very long time but I don't think I saw these lip balms at drugstores. It's sold on Sephora for $6-$7. It looks and feels a lot like Vaseline on lips. The only different is that it has a rose scent which you might or might not like. I'm not sure if it has the same ingredients as those in Vaseline.
Lipsticks with glossy finish (all levels of coverage)
Normally, if I don't want my lips to feel heavy, I don't apply lip balm before using this type of lipsticks since they tend to be already moisturizing and creamy. However, some cheap lipsticks can feel creamy at first but then dry out lips quickly. In that case I don't recommend using those lipsticks anymore but if you still want to, apply non-glossy lip balm underneath or whenever your lips feel dry.
Lipsticks with satin and matte finish
Never forget to use lip balm before applying satin and matte lipsticks, especially the matte ones because they have the driest texture. Don't use a glossy lip balm (like Carmex or Vaseline) since the pigment won't show up well. If you have to, wipe off some of the glossiness before applying lipsticks.
To look the best with these type of lipsticks, your lips must be smooth with no death skin/flakes to begin with. Luckily, there are some satin and matte lipsticks that can cover all those imperfections well but they tend to be very thick. I'm very picky with the feel of lipsticks and can't stand it when it feels heavy even just a little, but again, maybe it's just me.
If you have satin/matte lipsticks that accentuate imperfections (most of the lightweight ones do) and your lips are chapped, don't even think about using those lipsticks. Keep in mind that it's not the lipsticks' fault that your lips look unattractive. If you never want to prepare your lips to be in the best condition before applying these type of lipsticks, you shouldn't waste your money on them.
_ _ _ _ _
I hope this post will be a big help for those who have chapped lips like I used to. This post is too long so I broke it down to 2 parts. In
Part 2 I'll show you how I create smooth satin/matte lips and gradient lips.
Thank you!